How to connect a telephone jack?
Varieties of Connectors
The following are the types of connectors for the new sample:
- RJ 9 is one of the connectors that is needed to connect the handset to a stationary unit.

- RJ 11 - connects one telephone, the most common option, is used, as a rule, in multi-apartment residential buildings, where one telephone line.

- RJ 12 - in residential buildings are not popular, as they have contacts with 4 wires, which makes it possible to connect to 2 phones of a separate line. For private houses and apartments this is not necessary, therefore such a telephone socket is popular in office premises.

- RJ 14 - is considered universal, as it allows you to connect both to one line (lines connect to 2 and 3 contacts) and to several lines (connection to 1 and 4 contacts).

- RJ 25 - differs from the previous type in that it has 3 pairs of working contacts. Installing and connecting such a connector is very complicated and requires specialist skills. It is difficult to establish it yourself.

Step-by-step installation instructions
So, how to install and connect a power outlet for your phone? First of all, you need to check the availability of the device connection diagram. Of the tools you will need a screwdriver, an electric drill and the telephone jack itself.
Note: in working condition, the voltage on the line can rise to 120V. Therefore, in order to limit yourself from such unpleasant moments when installing and connecting the telephone outlet to the network, it is better to use dielectric gloves.
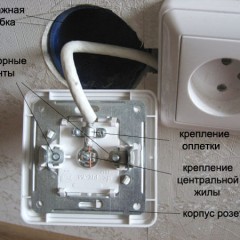
Before proceeding with installation, it is necessary to disconnect the electrical network. Then, using side cutters or a knife, remove the insulation from the conductors. This must be done carefully so as not to damage the veins. After all, if they are damaged, they will easily break. You need to strip the cable at a length of 4 cm. how to remove cable insulationread in our article.

Use a tester to determine the polarity of the conductors. Typically, a telephone jack has a red positive conductor and green a negative one. But it is better to check, since it is not known how the installation and connection were made. If the device was not at hand, then the connection is done according to the existing plan (the diagram is attached to the device).
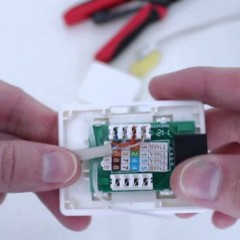
The next step after checking the polarity is to connect the cable cores, as shown in the photo below. After that, the telephone socket is fixed on the wall. After installation, you need to connect to the network and test the installed device.


It should be noted that the body can be of a hidden type. How to install and connect a hidden socket for the phone? First of all, it is necessary to mark the wall where the device will be installed. Using a punch, make a hole and fix the structural elements with screws. Installation ends with mounting the protective housing and testing the fixture that was installed.
If at home you need to install and connect a power outlet for a phone with 2 outputs (installation of several devices with different phone numbers), then there is one nuance to consider - installation occurs with a large number of conductors. But in general, there are no significant differences in work.
Wiring diagrams
The method for determining the polarity without a device has several advantages. It has been checked more than once. There are many options color marking wires and when the device is installed and connected, there is a chance of becoming even more confused.
The telephone socket is installed according to certain schemes. Such a scheme is developed in advance. As a rule, polarity does not matter much. But some telecommunications devices may fail or malfunction if this is not taken into account. The device connection diagram is provided below:


In order to simplify installation, manufacturers mark the contacts (the diagram and designation must be attached to the device). It can be in the form of numbers that are written near the contacts or on the diagram. Or the wires are indicated in a specific color.
How to correctly mark the twisted pair cable cores when installing and connecting the outlet is indicated in the tables below:


Useful Tips
Well, the last thing I would like to provide you with is some useful tips for connecting your own telephone jack. So, consider the following nuances during installation:
- To date, the most popular is the internal outlet for the phone. Since it is able to harmoniously fit into any interior of the room and it is not very noticeable. But when installing it, you must take into account the fact that the finish of the walls can be damaged. Yes, and spend more time.
- Buy products should be from trusted manufacturers. These include the company Legrand and Vico. After all, they have already positively established themselves in the modern market.
- If the numbering of contacts was not indicated on the case of the purchased device, then you must familiarize yourself with the rules for marking wires by color. So to indicate positive contacts use green, blue and orange in conjunction with white. For negative contacts use the same colors, but without white.
- An old format telephone jack has a different labeling standard. Therefore, if the installation of just such a device is carried out, then you need to know these rules. For example, black, orange and green are used for the plus. For minus - yellow, blue and red.
Finally, we recommend watching a video on which the issue of installing a wall outlet for the phone is raised:
So we examined the technology of installing and connecting a telephone jack to the line. We hope that the information provided helped you do the installation yourself!
It will be useful to read:


Thanks for the detailed instructions and most importantly, for the comparison of color schemes! Your article helped me a lot!