Correct setting of the outlet with a timer
Mechanical
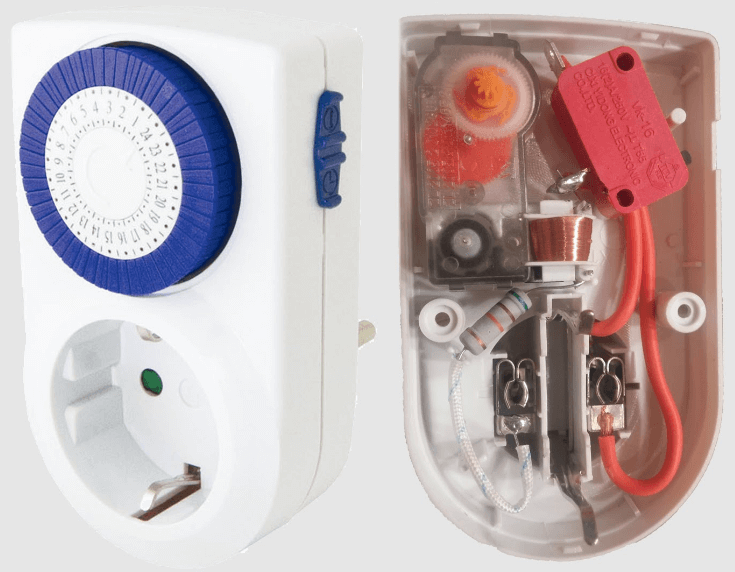
The heart of the timer is a drum, with switch levers mounted on it.The drum is driven by a micromotor. The actuator is a microswitch with one pair of contacts.The sockets with a cycle for 24 hours are very popular, they are also called the daily timer. As a rule, one hour is divided into four parts, fifteen minutes each.
As you can see in the photo, the design of the Feron TM50 outlet is quite primitive. Setting up such a timer comes down to setting the switches on the drum in the desired order in a specific time sector and forcing the manual setting of the effective time by scrolling the drum clockwise to the pointer arrow. A switch is installed on the side of the relay to force the load. Let’s try, using a small example, to find out how to set up a socket with a mechanical timer, model Feron TM50.
In this diagram, the operating time of the filter pump in the pool is distributed per day:
- From one in the morning until two, meals are not served.
- After two nights, the pump starts for fifteen minutes.
- From four to five it is off.
- At 6.00 for fifteen minutes, the pool filter works.
- After this happens at nine and twelve hours, again for fifteen minutes.
- At 15.00 peak swimmers turn on the pump for thirty minutes.
- At six and nine in the evening we make the pump work for thirty minutes.
- And the final cycle at twelve nights for 15 minutes, we filter the water.
There is an opportunity to save if you correctly configure the outlet with a timer and use a two-tariff electricity meter.
According to the settings in the diagram, it becomes clear that the consumer is disconnected during peak tariff hours, when the price per kilowatt of energy consumed is one and a half ordinary prices.From eight in the morning until eleven the device is turned off. The same is in the evening peak from eight to ten in the evening. The rest of the time, a socket with a timer keeps the consumer on.
You can learn more about how to configure a mechanical outlet with a timer in the video below:
Another popular model from Feron is the TM32. The configuration features of this outlet are also discussed in the video review:
Electronic
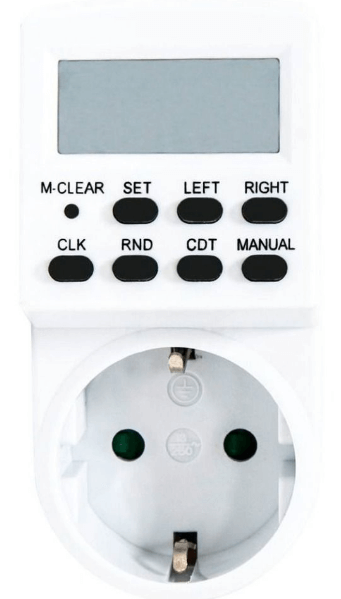
Using the TM24 as an example, consider how to configure an electronic outlet with a timer.
When you turn it on for the first time, you must leave the device for 12-14 hours in a power outlet to charge the built-in battery.
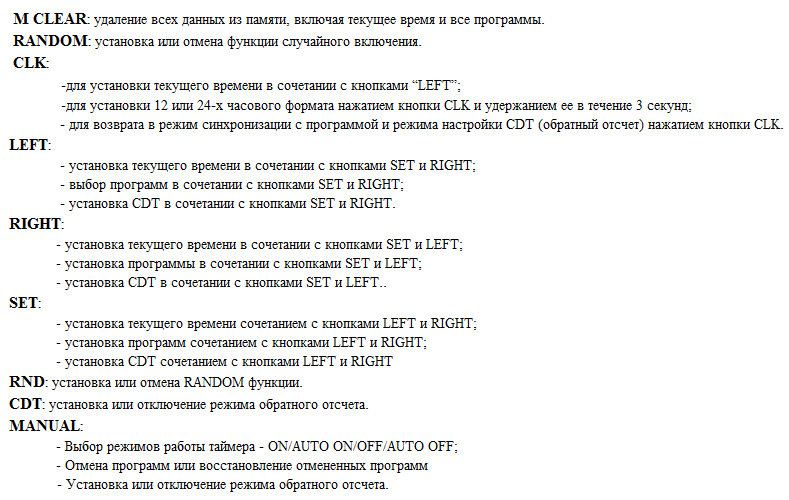
Button Functions:
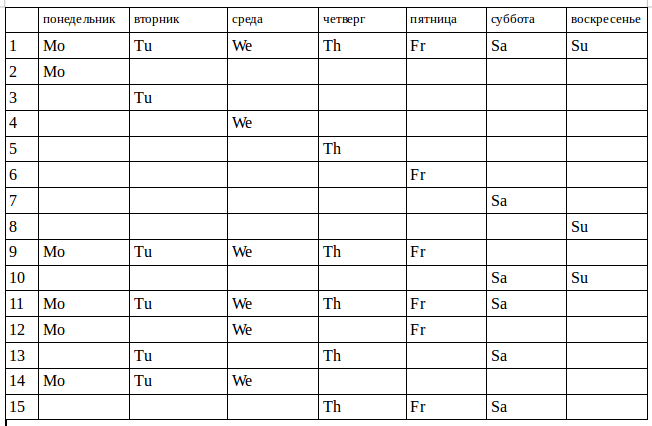
This programmer has the ability to configure twenty programs on and off.
As can be seen from the diagram - point 1, it is possible to install the program from Monday to Sunday. That is, at one time it turned on and off. Setting up individual programs by day of the week from the 2nd to the 8th point. The combination of the program on weekdays from Monday to Friday, paragraph 9 or only on weekends (Saturday and Sunday), paragraph 10. For six days a week, paragraph 11. Every other day, Monday, Wednesday, Friday, paragraph 12. Tuesday, Thursday, Saturday, paragraph 13. Three consecutive days, paragraphs 14 and 15.
To start using the outlet, you must first set the current time. Hold SET for 5 seconds until the day of the week flashes. Use the RIGHT or LEFT buttons to set the desired day. Pressing and holding on SET again takes us to set the clock. Use RIGHT or LEFT to set the desired time. We repeat the same procedure to set the minutes.
Now you can begin to configure the program. You can do this as follows:
- Press and hold RIGHT until “1_ON” appears, this is the first timer.
- After that, press and hold SET until the days of the week blink, use the RIGHT or LEFT buttons to select the desired day or combination of days.
- Next, using SET, select the hours and RIGHT or LEFT the desired value, and so on with the minutes.
- Then repeat the operation with RIGHT held until the value “OFF_1” appears.
- Repeat the setting similarly to the item above, set the day, hour and minutes.
- To exit the programming mode, press CLK.
Press the MANUAL button to reset the current program settings to set new parameters. To force the timer on or off, there is the “MANUAL” function, which has three modes: “MANUAL-OFF”, “MANUAL-ON”, “MANUAL-AUTO”. In OFF mode, the timer does not execute programs and is in the off state. In ON mode, the device is in the forced position, and in AUTO mode, programs are executed.
To simulate the presence of a person on the outlet there is an interesting RND button.This is a floating timer advance function that randomly varies from two minutes to half an hour. The development of the time interval takes into account the lead.Turning on electrical appliances is not tied tightly to a specific minute, which can confuse thieves trying to figure out people at home or not.
Instructions for setting the parameters of the electronic outlet are provided in the video below:
Setting up the remaining outlets with a timer is no different from the installation algorithm described by us in the example, and should not cause difficulties. Do not forget to switch the clock to winter and summer time for a more correct operation of the device.
We hope our instructions were clear and useful for you. Now you know how to set up a socket with a mechanical and electronic type timer!
It will be interesting to read:

